ARDUINO MIDI CONTROLLER
This guide will help you to build an easy and expandable MIDI controller with a Arduino board. In this case we are going to use a Arduino Nano for it’s small size, but any Arduino like UNO or Leonardo will work. No problem if you don’t have programming experience, Arduino it’s a very easy way to start building your own things and we are here to help!
ARDUINO SETUP
The first thing is to download the Arduino IDE from https://www.arduino.cc/en/software, that’s the software you are going to use to program the Arduino board. Once installed you have to setup your board. The boards you can find on our online shop are Arduino Nano boards compatible. If your computer don’t detect the board you have to download the CH340 driver from https://sparks.gogo.co.nz/ch340.html. Your Arduino IDE setup should be like this:
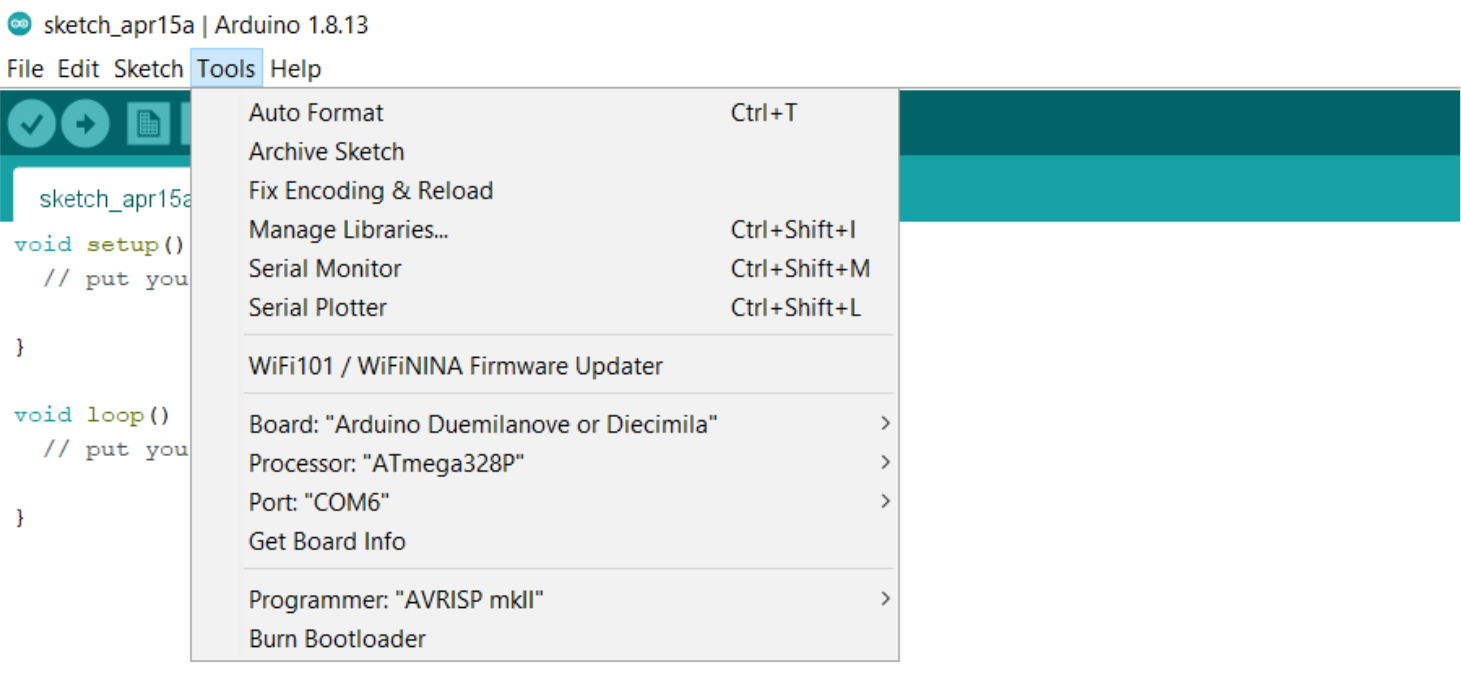
Board: Arduino Duemilanove or Diecimila
Processor: ATmega328P
Port: The COM port number where your board is connected
Programmer: AVRISP mkII
Connect the Arduino board to your computer with the USB cable. You can test if the board is working with a simple programm that makes the small onboard red LED (marked as L) blink.
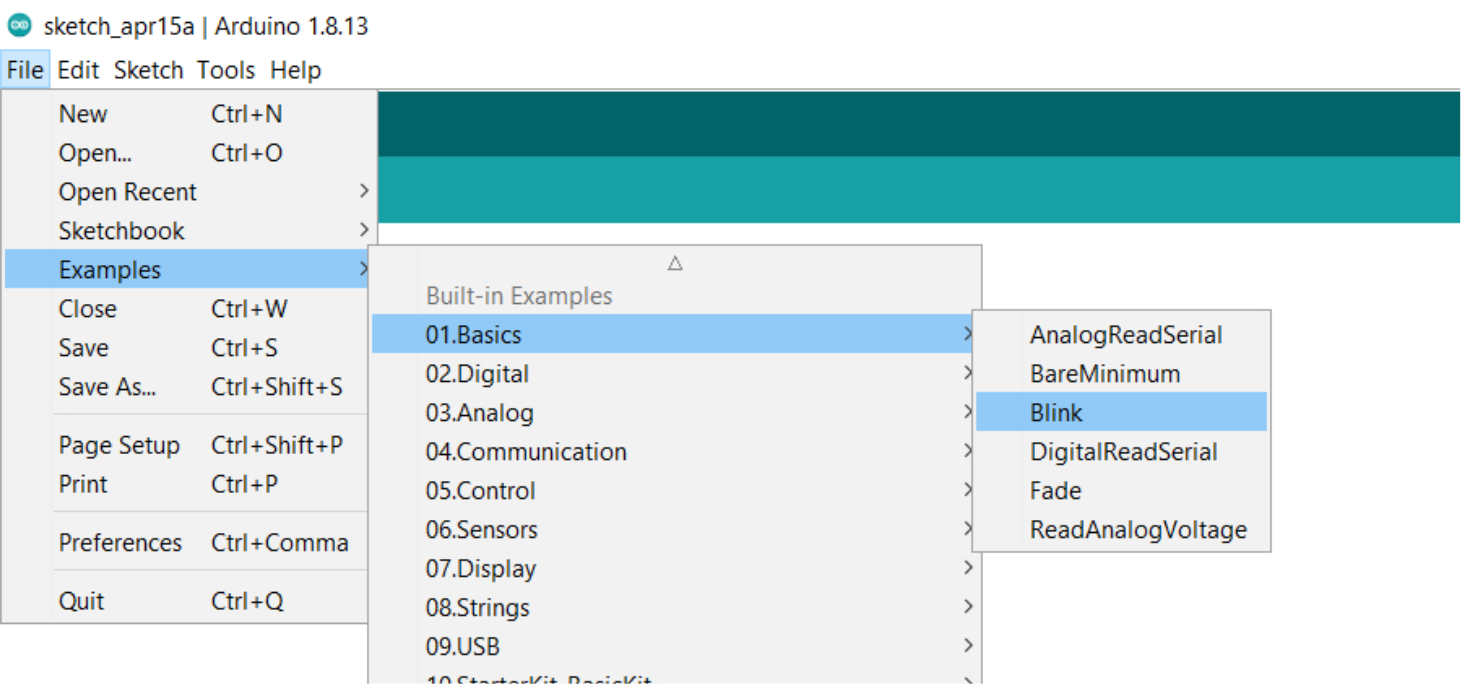
Go to File->Examples->01.Basics->Blink
Don’t worry if you don’t understand what the code is saying, we are going to learn that later. Just click on the Upload icon, and if everything has worked fine you should see Done uploading in the status bar, and the onboard red LED blinking with a tempo of 1s.
If you see that, then you have you board ready for future projects. You can program your board so many times as you want and use our projects code or your own code to create nice pedals and tools. If the program fails check that your setup is correct, also check your USB cable. Sometimes it’s a syntax error, just be patient and try to find the error. We are also here to help, don’t hesitate to contact us at info@tweakable-parts.com
FIRST STEPS
First of all we are going to test the MIDI connection to be sure that our Arduino is sending MIDI messages. We have two options: USB Cable or MIDI Connector. We can use the USB cable connected to the Arduino to read the MIDI messages on our computer. This is the easiest way, you don’t need any extra cables or MIDI connectors. You only need to download a software that reads the serial messages from our Arduino and convert them into MIDI messages. This program is the Hairless MIDI to Serial Bridge, created by Angus Gratton. You can download the software here https://projectgus.github.io/hairless-midiserial/
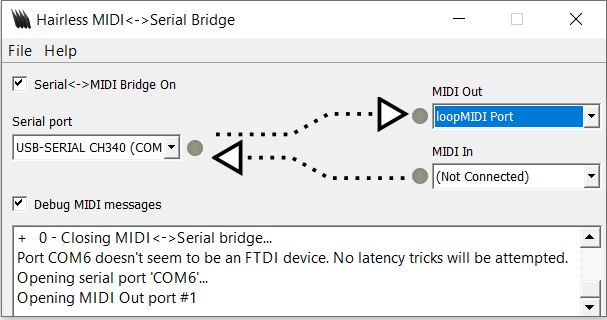
If you are using Windows you are going to need also a virtual MIDI port. Windows doesn’t have any MIDI port setup. You can use the loopMIDI, created by Tobias Erichsen. You can download it here http://www.tobias-erichsen.de/software/loopmidi.html
Just create a new MIDI port with loopMIDI, go to Hairless MIDI and use it as output. In Serial port select your Arduino board, in this case USB-SERIAL CH340 (COM6):
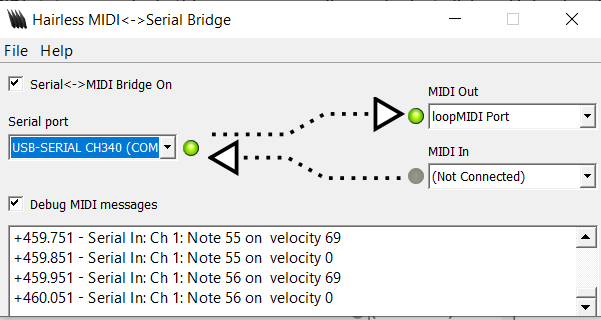
Now we have to program our Arduino to send some MIDI messages and test the connection. On Arduino IDE go to File->Examples->04.Communication->Midi
This easy program will send some MIDI messages and we are going to see this messages in the Hairless MIDI status console, in this case an ascending scale. You also have to change the Serial Baud Rate to work with Hairless MIDI. Change 31250 for 115200:
void setup() {

  Serial.begin(115200); // 115200 (Serial MIDI USB), 31250 (MIDI Connector Application)
  for (int i = 0; i < Number_Buttons; i++) {
    pinMode(Button_Pin[i], INPUT_PULLUP);
  }
}
Just click on Upload and open Hairless MIDI (Note: you can’t use Hairless MIDI and upload an Arduino sketch at the same time because they are sharing the same COM port, you have to deselect your Arduino from the Serial port list and once your program is uploaded select it again). You should see the MIDI messages in the status console:
You can also use a traditional MIDI output to be used with MIDI equipment. In this case you have to connect the Arduino board like this (the two resistors are 220 Ohms):
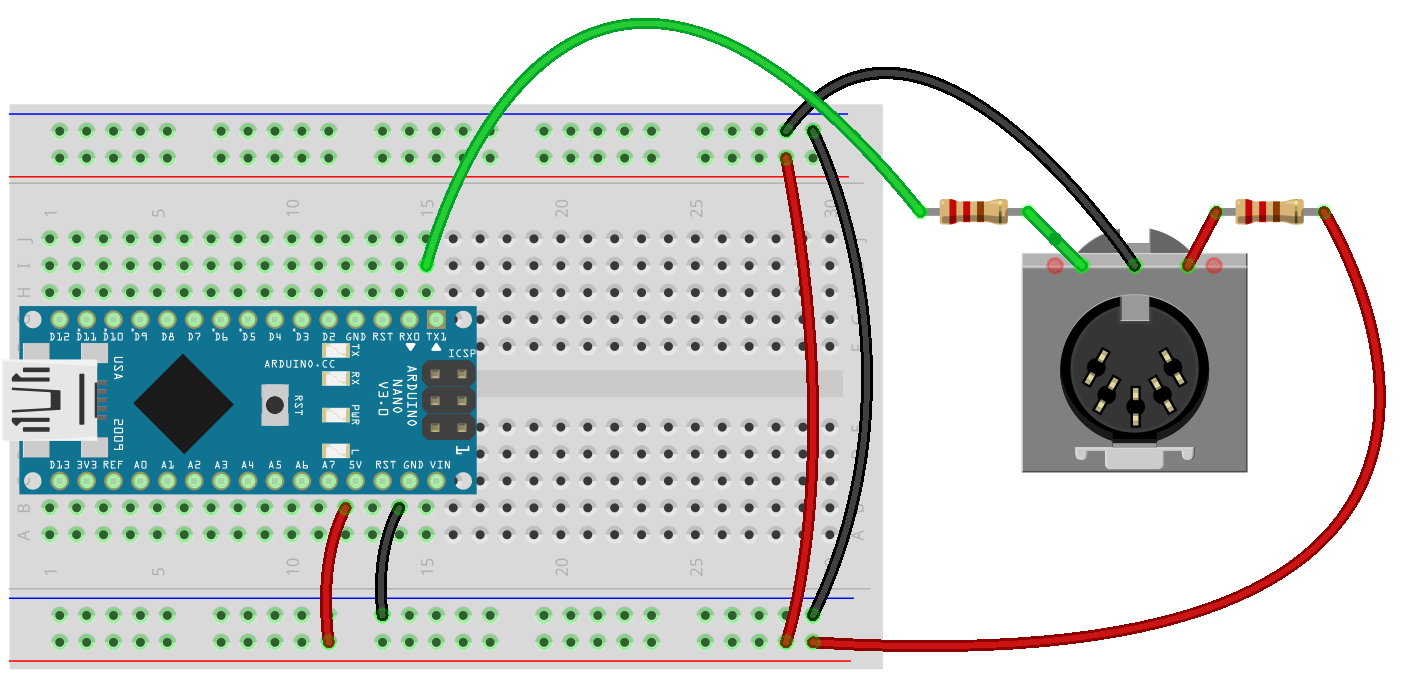
At the end of this guide you can find a link to all components we have used.
In the case you are using a MIDI connector the Baud Rate must be 31250:
void setup() {

  Serial.begin(31250); // 115200 (Serial MIDI USB), 31250 (MIDI Connector Application)
  for (int i = 0; i < Number_Buttons; i++) {
    pinMode(Button_Pin[i], INPUT_PULLUP);
  }
}
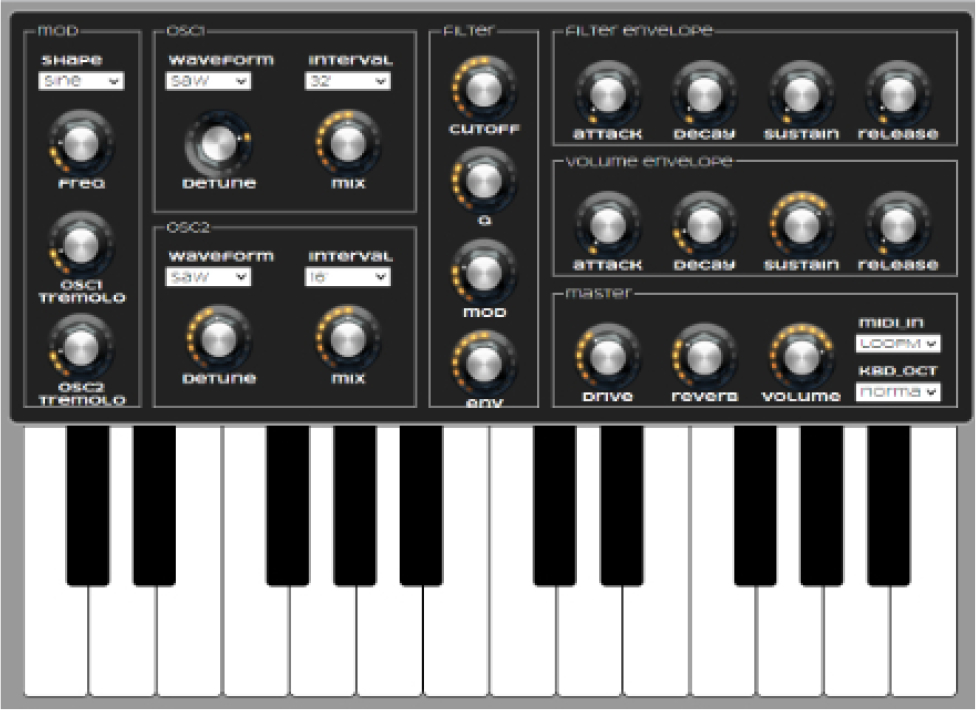
If you also want to hear this MIDI messages there is a very nice online Synth created by Chris Wilson: https://webaudiodemos.appspot.com/midi-synth/index.html
ADDING POTS AND BUTTONS
The coolest thing of this MIDI controller is that you can add potentiometers, buttons and switches to adapt it to your needs. Arduino Nano accepts up to 8 analog inputs (for example potentiometers) and up to 11 digital inputs (for example buttons and switches).
Let's start with some basic setup, with two potentiometers and two buttons. This is the wiring with all components (MIDI Out via USB cable, if you want to use a traditional MIDI connector use the wiring from the previous page)
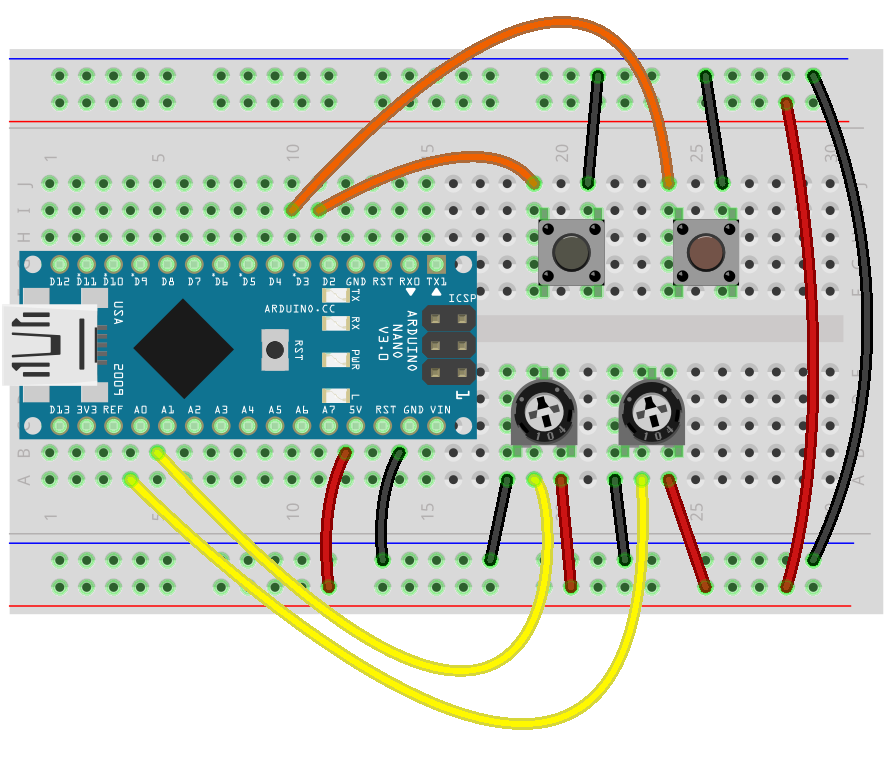
You can also change the small buttons for bigger footswitches, and the trimmers for potentiometers or sliders, the wiring is the same.
CODE
You can find the whole code HERE (MIDI_Controller_Basic.ino). This code is fully editable and customizable to adapt it to your project. Use it as the base to build wherever your DIY mind is thinking :-)
In many parts of the code you will see comments like this:
byte midiCh = 1; // MIDI channel
Everything that starts with // are comments, this lines are ignored by the compiler and are there only to help you understand the code.
Let's start with our MIDI Setup. Like in the MIDI code example we have to select the Baud Rate (31250 for MIDI Connector, 115200 for USB Serial). The next thing is to setup how many buttons and pots we have:
const int Number_Pots = 2; // Number of pots you have
const int Pot_Pin[Number_Pots] = {A0, A1}; // Pins where your pots are connected, in the case of Arduino Nano: A0-A7
const int Number_Buttons = 2; // Number of buttons you have
const int Button_Pin[Number_Buttons] = {2, 3}; // Pins where your buttons are connected, in the case of Arduino Nano: 2-12
In our example we have only two pots, connected to Arduino analog pins A0 and A1. And two buttons, connected to Arduino digital pins D2 and D3 (2 and 3 in the code).
The next important setting is what do you what kind of message do you want to send with your pots. Using the fantastic Synth from https://webaudiodemos.appspot.com/midi-synth/index.htm we can control all parameters via MIDI. For that we have to know which messages control each parameter. This two are a good start for our two pots:
-MOD: Control Change 1 (0-127) and Channel 1
-CUTOFF: Control Change 2 (0-127) and Channel 1
How can we send those messages with our Arduino? Take a look at the code:
MIDI.sendControlChange(cc + i , potCurrentState[i], midiCh); // cc number, cc value, midi channel
Arduino will read both pots, and if we rotate the pot, the program will send the current pot
value and convert it to MIDI messages. You don’t have to worry now if you don’t understand
everything in the code, we try to make it easy for now and build a basic setup. At the
beginning of the code there are three important lines:
// MIDI Channel, Note and CC initial setup

byte midiCh = 1; // MIDI channel
byte note = 60; // Initial note
byte cc = 1; // Initial MIDI CC. The first pot will send cc1 (0-127) messages, second pot cc2 (0-127) messages...
Those are the default messages for the first pot and button in the row. If we have only two pots connected to A0 and A1 the first one is going to send CC1 messages, the second one is going to send CC2 messages. You can change that in byte cc if you want to start with another value. The default MIDI channel is 1, but you can also change that. If we send notes the first note is going to be 60 (middle C on a piano).
Same thing for the buttons:
MIDI.sendNoteOn(note + i, 0, midiCh);
In this case we send a note (60 for button connected to D2) with a value of 0 in MIDI Channel 1 if our button is not pushed. In our Synth that means note is off.
MIDI.sendNoteOn(note + i, 127, midiCh);
In this case we send a note (60 for button connected to D2) with a value of 127 in MIDI Channel 1 if our button is pushed. In our Synth that means note is on with max velocity.
Try to upload the code and open the online Synth (if you are using USB Serial don’t forget to select your Arduino in Hairless MIDI). If you rotate your pots you should also see the Mod and Cutoff controls rotate. And if you push your two buttons you should hear C and C Sharp.
And that’s only the beginning. You can add more buttons, switches and potentiometers to your circuit and adapt them in your code. You can control build your own MIDI Controller for your MIDI compatible pedals, control synths, pair your buttons and pots with your favourite DAW or virtual instrument….
We are going to publish more projects and ideas, stay tuned!
2 Comments
Very nice
thanks bro..u\'re genius....its help me...big thanks